How to File Multiple Pleadings into The Same Case Number ( GROUP EFILE )
If you have multiple pleadings to file in the same case, that's no problem. For example, you may want to file the following documents in the same case: Notice of Serving Interrogatories, Request for Production, Request for Admissions, and a Subpoena Duces Tecum. eFileMadeEasy will allow you to select multiple pleadings to have file at the same time. It's fast and easy.
HELPFUL TIP: Use this method to file any document that requires a Notice of Confidential Information Within Court Filing to be filed with the pleading.
Brief Instructions from Word (for Select of .PDF's without Word see below)
Filing multiple pleadings consists of:
- Create, edit, and make sure the pleadings are ready to be filed. All pleadings must be for the same case.
- Click the eFileMadeEasy menu item from your word processor (See Basic eFile instructions) and select the eFileMadeEasy button (this will open the eFileMadeEasy window). You could also use the drag and drop method if your file is already a .PDF.
- Click the "Group eFile" button.
- Select all of the pleadings you want to file in the same case, you can multiselect, and click Open.
- Click the "Group eFile" button.
- Select whether it's an emergency efile.
- Click yes...and your documents will be eFiled with the portal and eServed to your service list.
Detailed Instructions
Figure 1 shows the Microsoft Word document window with a sample document ready to be efiled. The top menu will show the eFileMadeEasy menu item and the eFileMadeEasy button. Selecting the eFileMadeEasy button will perform the following functions on the Word document:- Scrubs all meta-data from the file. Meta-data is hidden information that contains private information about you, your firm, and your document. All of this is removed during the process.
- Makes the document OCR text searchable.
- Scanned files cannot be searched and are against the rules of almost every portal as they do not comply with the American's With Disability Act (ADA).
- Makes the document 300 dpi
- Converts the document to a black & white PDF file (NEVER FILE YOUR WORD DOCUMENTS WITH THE PORTAL!!!)
Selecting the eFileMadeEasy option will open the eFile Software. You will notice that the file is listed in the "Process Queue" and is shown as a PDF file. The file is ready to be eFiled with the portal and eServed to your service list. At this point, if you have multiple attorneys who are listed in the user window just select which attorney is filing the document, and click the Group EFile button. See Figure 2.
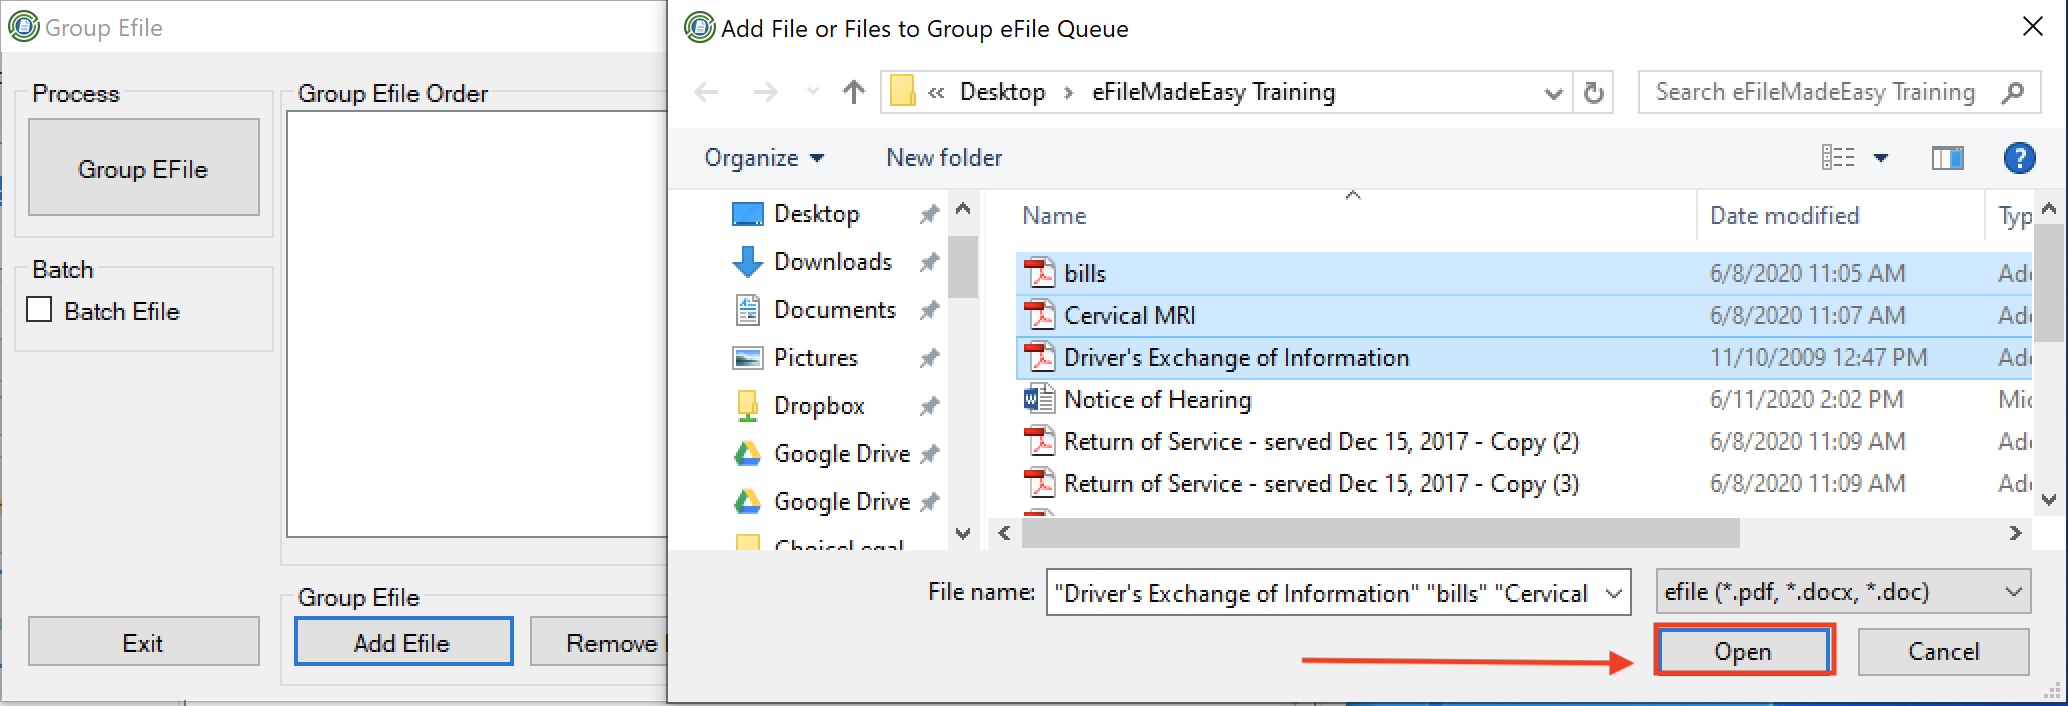
Once you've selected the Group EFile, you will be presented with the Add Files To Group eFile window (See Figure 3 A and B). Select the files you would like to include. You can select multiple documents using the Control-Click method or the Shift-Click method. Once you have selected your documents hit the Open button.
Note: You can only add either .PDF files for group eFile. Any Word .doc or .docx files will automatically be converted to PDF files by eFileMadeEasy.

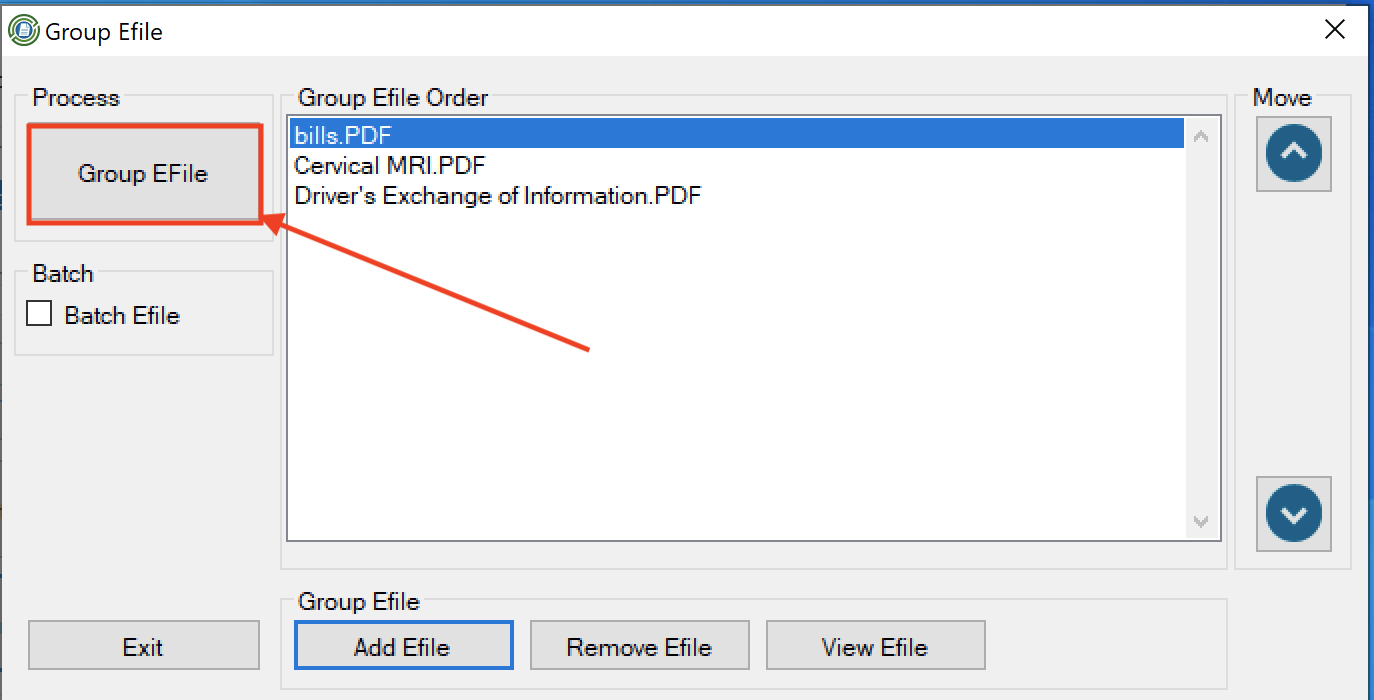
After you have selected your documents and hit the open key, the eFileMadeEasy Group eFile window will open for you to put your documents in the order you would like them filed (See Figure 4.) You can use the move arrows to place your documents in the correct order. Simply click on the document and use the up or down arrows to put the documents in the order you would like.
HELPFUL TIP: Generally, it does not make a difference how files are ordered for the ePortal. However, there are times where documents may need to be filed in a certain order based upon individual clerk requirements.
When you have all of your documents input and ordered hit the Group Efile button.

Once you've selected the Group Efile button you will be presented with the Confirmation Screen (See Figure 5).
At this point you may also select whether the filing is an EMERGENCY. Emergency eFilings have a small additional fee but get rapid attention. See Emergency Filing section for more information.
Click yes or no. Selecting NO will allow you to correct any errors or make different selections to eFile using eFileMadeEasy. Selecting yes will send your pleading to us to be processed.
That's it. Your pleadings will be filed with the ePortal as a group and your service list will be served. You will receive an email with your documents attached as PDFs and the confirmation information from the portal.
Manually select .PDF's for Group eFile
If you already have a group of .PDF files you can submit your group without using Word by simply selecting the .PDF files.Simply select the filing attorney and hit the Group eFile button.
The Group eFile window will open allowing you to add files to the group. Remember, a Group eFile is for multiple pleadings in the same case. Select the "Add File" button.
A window will open allowing you to select the files you want to add to the group. You can multi select if you like. When complete selecting files hit the, "Open" Button.

Proceed to eFile the Group documents.

Proceed to eFile the Group documents.
Related Articles
How to Cancel a Submission In Windows Version - Legacy
If you have submitted a pleading to eFileMadeEasy that has not been filed with the ePortal, you can cancel the file. If the file has been filed with the ePortal (if it has a portal reference number) you can't cancel using eFileMadeEasy. You must ...How to Cancel a Submission In Web Version
If you have submitted a pleading to eFileMadeEasy that has not been filed with the ePortal, you can cancel the file. If the file has been filed with the ePortal (if it has a portal reference number) you can't cancel using eFileMadeEasy. You must ...How to turn on ( Templates / File Splitting ) in eFileMadeEasy
How to turn on ( Templates / File Splitting ) in eFileMadeEasy Open eFileMadeEasy Click Tools->Control Panel Tools->Control Panel Click Program Options Button Program Options Check Allow File Split Allow File SpliteServeMadeEasy Tutorial
eServeMadeEasy is designed to allow quick and easy filing with the Florida Department of Insurance, Legal Service of Process (LSOP). By simply dropping the summons into eServeMadeEasy we will serve your pleadings to LSOP. 1. Contact eFileMadeEasy to ...How to use eFileMadeEasy Drag and Drop
Sometimes you just want to find your file and file it without having to open Word or Acrobat. eFileMadeEasy provides drag and drop functionality. WARNING! Using Drag & Drop for .DOCX files may result in formatting issues. We recommend that you ALWAYS ...